Introduction to Spring Restful (JSON) + Hibernate with AngularJS
Background and Pre-request
This blog will show you how to build Spring Restful + Hibernate ORM models with AngularJS web application, the example here will use JSON to communicate between Spring controller and AngularJS web UI. After running through our example, you should be able to master Spring Restful and make HTTP JSON request using AngularJS.
Before the examples, you need to have:
- Java JDK 1.7 or later
- Eclipse 4.5.1 Mars or later
- Tomcat 7 or later
- MySQL 5.7 or later
- Maven plug-in (m2e)
With Eclipse Mars, you don’t need to install the Maven, because starting from Eclipse 4.3 Kepler, it already includes the Maven so that you don’t need to install Maven plug-in (m2e).
Please make sure:
- Install MySQL (using 5.7 for our example), you can download from http://dev.mysql.com/downloads/mysql/
- Install JDK from Oracle (using JDK 1.7 for our example), you can download from http://www.oracle.com/technetwork/java/javase/downloads/index.html
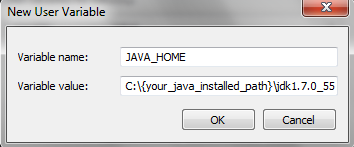
- Setup JAVA_HOME path
a. Right-click on “Computer”, and click on “Properties”.

b. Click on “Change Settings”

c. Click on “Environment Variables”

d. Under “User variables for XXXX”, click on “New” button to create a new user variable
Input “JAVA_HOME” as variable name and C:\{your_java_installed_path}\jdk1.7.0_55 as your variable value. If you are using different version of JDK, please update the path value.
- Download and install Eclipse (prefer Eclipse Mars or upper), you can download from https://eclipse.org/downloads/
- Download and install Tomcat (prefer Tomcat 8 or upper) from http://tomcat.apache.org/download-80.cgi
- After installed JDK, Tomcat and Eclipse, you can setup the JDK version and Server Runtime for your Eclipse.
- Open the Eclipse
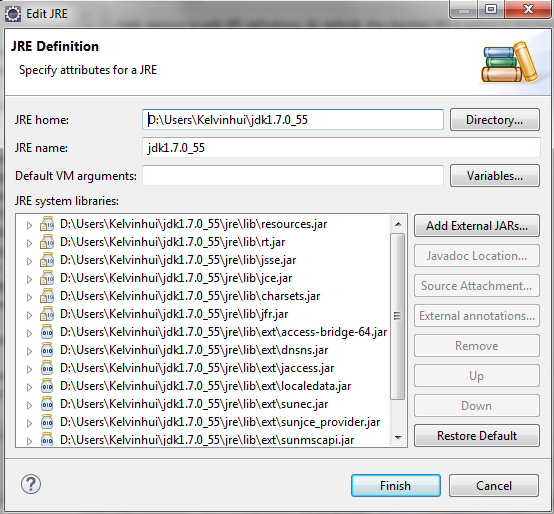
- Setup the JDK version : select “Window” => “Preferences” => “Java” => “Installed JREs” => setup your JRE home path:
9. Setup the Server Runtime : select “Window” => “Preferences” => “Server” => “Runtime Environments” => click “Add…”

Click “Next”, and fill in your tomcat installed path:

Click “Finish” to save it.
Development environment has been setup successfully, you can now start playing with the examples in the coming blogs.


